Isolated environments with nix-shell and zsh
If you've heard about Nix before and wanted to try it out for a simple use case you can skip directly to "Before continuing" section
If you're an occasional user of NPM or PIP you probably experienced a highly frustrating process of going through series of StackOverflow guided pip --upgrade, pip uninstall this, sudo rm -rf that just to install a tiny package you need to run only once. After 2 hours the best option seems to wipe out PIP altogether just to install it freshly... Eventually, after reinstalling PIP, you managed to run the command you needed. You are quite sure you broke a few other things on your way, but well, at least you finished your task. Tomorrow will be the day to tidy your system up.
I went through the above process more times than I would like. Although I don't have hard data on this, everyone I talked to had this kind of problem a few times as well. The popularity of StackOverflow threads related to corrupted PIP and NPM states and twitter mentions suggests it is a widespread issue indeed.
I've heard a lot of good things about Nix and experimented with it a bit but I was missing a useful enough, and at the same time easy enough, use case to put it into practice. I got a new laptop some time ago and for the sake of "stepping out of comfort zone" I decided not to install any packages using PIP or NPM on that machine. Instead, I resolved to install as much as I can using Nix.
Nix is a package manager so you can think of it as a replacement of say apt-get or brew. In this blog post I want to focus on nix-shell which uses Nix in order to create isolated, project-specific environments - something similar in spirit to virtualenv.
Keep in mind it's just one many other use cases of Nix, yet perfect for educational purposes. It solves a real problem with only a small investment of effort in learning Nix. Also, there's no risk of corrupting any system-wide package as Nix keeps all its files in /nix directory.
Why Nix
It's common in the field of Software Engineering that a new tool promises to solve issues of its predecessors without providing any rationale, in-depth analysis or even basic research in prior work. The result of such an approach is a multitude of tools that do not differ that much from each other - all of them sharing similar strengths and weaknesses. That's not the case with Nix though.
Nix origin traces back to Eelco Dolstra's PhD dissertation in which he rethought package management from the ground up. He envisioned Nix to be a purely functional package manager built with full reproducibility in mind. I don't want to elaborate too much on Nix design here, especially given that there are a lot of resources on that. A good starting point might be the first chapter of the Nix manual or the presentation by Joël Franusic.
Before continuing
In the remainder of that article I assume you have Nix installed. I recommend completing Quick Start - it should not take more than 10 minutes and it will walk you through installation and complete basics.
Example 1 - awscli
In the first example, we will install AWS CLI version 1. I used to install it with PIP as described here but I wanted to use Nix this time.
First I verified I don't have a system-wide AWS CLI installed:
> which aws
aws not found
My task is well defined now - it's to bring aws into scope. Let's start with creating a directory for project:
mkdir aws-cli
cd aws-cli
zsh trivia: you can accomplish the same with single command: take aws-cli
To install it within newly created directory I saved file default.nix with the following content:
with import <nixpkgs> {};
stdenv.mkDerivation rec {
        name = "aws-cli";
        buildInputs = [ awscli ];
}
With such file in current directory I can:
> nix-shellIt will trigger building a new environment, namely downloading all declared artifacts and their dependencies from cache.nixos.org and/or building from sources. It may take some time for a first time but eventually you should end up in another shell. Let's verify whether AWS CLI was installed there:
> which aws
/nix/store/kc8s3h40kbzlwa9al2yhnwy0gvjxcslf-awscli-1.17.13/bin/aws
It was enough to create an isolated environment with AWS CLI available. Let's step back and understand what happened:
- If you wonder what actually that 5 lines of Nix code do please read this short article focusing mostly on that. From a pragmatic point of view, merely to be able to use nix-shell for simple use cases, you can copy-paste that file content and just edit
buildInputsaccording to your needs. name, set toaws-cliabove, serves only informational purposes in case of nix-shell. We will display it as part of bash prompt later on.- How did I know that I should use
awscliinbuildInputs? I found it out using nixpkgs browser. - What is nixpkgs then? It's an official, community curated Nix channel. Nix channels is a mechanism for sharing Nix packages, in a way similar to e.g. apt's repositories. When you want to install something nixpkgs will be the first place to look into.
- Nix stores artifacts in
/nixwhich allows having multiple versions of the same package. Packages and their versions are resolved per each nix-shell environment using symlinks. That short article presents how easy it is to use different python versions in different projects. - That also means that none of the system directories were touched. If you hadn't had AWS CLI installed system-wide before running
nix-shellyou also didn't have it afterwards
- Bonus point - you don't need
sudoto use Nix nix-shellcommand accepts the name of the file as a parameter. We didn't pass it in our example as in case of absence of parameternix-shelltries to opendefault.nix.
A particularly interesting option of nix-shell is --pure parameter. With that option nix-shell will have access only to packages explicitly defined in the Nix build, in our case in default.nix file.
To demonstrate that I will try to execute command git, first in my standard shell and then in nix-shell:
# Default system-wide console:
> git --version
git version 2.20.1
> nix-shell --pure
# Then within loaded nix-shell:
> git --version
bash: git: command not found
As you see, even though I have git installed system-wide, it failed from within nix-shell --pure because I haven't declared git in default.nix.
--pure, while not being very useful for day-to-day work, is invaluable for ensuring that the definition of your build will run successfully on any other machine. --pure gives you a full certainty because there's no way that some package, you just happen to have installed in your system, can leak into a nix-shell environment.
Refining example 1 - zsh support and direnv
zsh support
There's a serious inconvenience with the solution in a current shape but it's not apparent by looking at code snippets. However, it's easy to illustrate it with pictures.
Native zsh console lacking aws command:

nix-shell console has aws installed but otherwise looks ugly:

The starkest difference is lack of colorful prompts and thus no information about git branch, time, exit code of the previous command, and so forth. Shell in that form turns out to be even less practical if you try to use it - that's the moment when you realize how much you, and your muscle memory, rely on aliases and zsh plugins.
Naive nix-shell like this is good enough if you want to run a single command but cannot replace a full-blown, configured zsh. As a consequence, I found myself constantly switching between nixified console for aws and normal, non-nixified console for anything else. Until I got to know about zsh-nix-shell.
As an oh-my-zsh user, I followed installation instruction from here. Result:

It works nicely - nix-shell looks identically as my normal shell and has its all precious functionalities. However, in practice, it's very useful to have some graphical indicator to distinguish nix-shell from a standard shell. We can configure it with that zsh-nix-shell feature. To set it up for powerlevel9k theme I made 2 following changes:
The first change, in .zshrc I edited POWERLEVEL9K_LEFT_PROMPT_ELEMENTS so it looks like:
POWERLEVEL9K_LEFT_PROMPT_ELEMENTS=(nix_shell dir rbenv vcs)The second change is a bit more involved but I mostly copied it from that gist (mentioned in here). In ~/.oh-my-zsh/custom/themes/powerlevel9k/powerlevel9k.zsh-theme (or whatever is the theme you use) I added:
# Mostly copied from https://gist.github.com/chisui/0d12bd51a5fd8e6bb52e6e6a43d31d5e#file-agnoster-nix-zsh-theme
prompt_nix_shell() {
  if [[ -n "$IN_NIX_SHELL" ]]; then
    if [[ -n $NIX_SHELL_PACKAGES ]]; then
      local package_names=""
      local packages=($NIX_SHELL_PACKAGES)
      for package in $packages; do
        package_names+=" ${package##*.}"
      done
      $1_prompt_segment "$0" "$2" black yellow "{$package_names }"
    elif [[ -n $name ]]; then
      local cleanName=${name#interactive-}
      cleanName=${cleanName%-environment}
      $1_prompt_segment "$0" "$2" black yellow "{ $cleanName }"
    else # This case is only reached if the nix-shell plugin isn't installed or failed in some way
      $1_prompt_segment "$0" "$2" black yellow "nix-shell {}"
    fi
  fi
}
The result:

It's a very comfortable setup. Please note that all the configuration made in this section to make nix-shell play nicely with zsh is a one-time job and you don't need to repeat it for every project.
Automatically open nix-shell with direnv
There's still one slightly bothering thing - you're required to nix-shell manually in the directory with default.nix. In many cases it might be desirable to automate it too. Fortunately, there's a tool for executing commands on entering a directory: direnv (installation instruction).
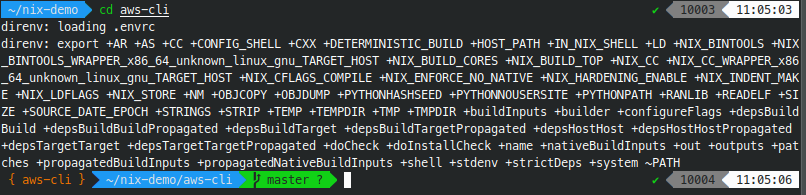
Once you have direnv installed configuring it in your project is a matter of:
# Execute in a directory containing `default.nix`:
echo "use_nix" > .envrc
direnv allow .
Result:
Example 2 - wscat (npm package)
Say you need a websocket client. After quick Google search, you might have decided to use wscat which is an npm package. It's not available in nixpkgs though so using it will not be as easy as it was in case of AWS CLI.
Let's begin with creating a new directory for that project:
mkdir wscat
cd wscat
The initial approach might be to install npm using the same technique we used so far:
with import <nixpkgs> {};
stdenv.mkDerivation rec {
        name = "npm";
        buildInputs = [ nodejs ];
}
That way npm will be available in nix-shell. Then we can create such package.json:
{
        "devDependencies": {
                "wscat": "latest"
        }
}
Then:
> nix-shell
# nix-shell opens and then:
> npm install
# With install completed:
>  ./node_modules/wscat/bin/wscat
Despite it works, it feels against the spirit of nix-shell. One thing you can easily notice is that we need to ./node_modules/wscat/bin/wscat instead of just wscat. It's not only a mere inconvenience, rather it's a symptom of a bigger issue. Note that npm install resulted in the creation of the directory node_modules and all npm artifacts are stored there. It circumvents the idea of nix, which we expect to store all the artifacts in /nix and reuse them between different environments.
It's where node2nix comes into play.
Refining example 2 - wscat with node2nix
As stated on node2nix github page it "generates Nix expressions to build NPM packages". We don't want to build NPM package but it still relevant - we can describe wscat as a development dependency and node2nix will take care of generating proper Nix expressions containing node, npm and any other dependencies.
Create a new directory with 2 files in it:
node2nix.nix:
with import <nixpkgs> {};
stdenv.mkDerivation rec {
        name = "node2nix";
        buildInputs = [ nodePackages.node2nix ];
}package.json:
{
        "name": "wscat",
        "version": "latest",
        "devDependencies": {
                "wscat": "latest"
        }
}
Then:
nix-shell node2nix.nix --run "node2nix --development"--developmentflag is crucial since we definedwscatasdevDependency
That generates node-env.nix, node-packages.nix and default.nix. Having default.nix means that we can run nix-shell:
> nix-shell
error: nix-shell requires a single derivation
Try 'nix-shell --help' for more information.
It's because generated default.nix contains a few derivations. We need to specify attribute path using -A option. node2nix documentation mentions that you should use attribute shell , as in:
> nix-shell -A shell
# and in a new console:
> wscat
Usage: wscat [options] (--listen <port> | --connect <url>)
...
As you see it worked well. Although whole process is simple, it's repeatable and contains a few gotchas like --development flag or -A shell, which you need to keep in mind. Therefore, I created a simple script to automate that process. It might be a bit simplistic and it's definitely not battle tested but it serves as good starting point for your own. Having that script aliased as npminstall creating a nix-shell environment with wscat boils down to single command:
> npminstall wscatIt will create a synthetic package.json, call node2nix and eventually create default.nix you can use with simply nix-shell.
Other considerations
this-to-nix, that-to-nix, everything-to-nix
As we saw in previous section - it's very convenient to have a tool to translate "traditional builds" to Nix. Although not necessary they provide a first-class support for packages created with traditional package managers. That's the reason for multitude of nix to X projects.
Why not Docker?
The scenario I consider here sounds like a use case for Docker (or containers in general): I want to run a single binary without caring about its dependencies. It's true that Nix and Docker overlap in that regard, however, Docker does more than just providing a package. Most importantly - it runs the binary in the container. The distinguishing trait of containers is process isolation - containers have limited access to filesystem, networking, CPU, and memory. In my case though I don't need process isolation - actually I just want to have aws-cli or wscat or jekyll in my console and I want them to access all resources without any additional ceremonies containers involve. Of course, there's no single answer and sometimes what you need is process isolation specifically but not in the case being discussed here.
Lorri and cachix
Lorri is supposed to be nix-shell replacement for project development. It fixes a few inconveniences of nix-shell, you can read more here. I have not tried out lorri yet so cannot tell anything else.
It's good to be aware of cachix too.
Where to go next
If you are interested in Nix I think it's a good idea to incorporate more and more of nix-shell into your daily work. It's a low effort endeavor and it can pay back by saving the time you normally spent fighting with inconsistencies in other build systems. A side effect, and a potential benefit, is learning Nix which might be a great investment given it feels like build tool of the future.
There's a very similar article focusing on different aspects. Both Nix manual and Nix pills are good reads too.